
Stateless + Blazor = Easy Integration of UI and Business Logic
In this post we are going to look at how we can pair Stateless, a simple State Machine library for .Net with Blazor in order to take the pain out of synchronizing your UI with your business logic.
Problem
Lets start with some business rules for a simple shopping cart.
- New shopping carts are in a draft state.
- Users can add items only to a draft cart.
- They can only remove items from a draft cart if some items exist.
- They can save a cart for later.
- They can change a saved cart back to draft, if they want to edit it further.
- They can purchase a draft or saved cart, so long as there are items in the cart.
- They can delete any draft or saved cart.
- They can always add a note to their cart, regardless of the state.
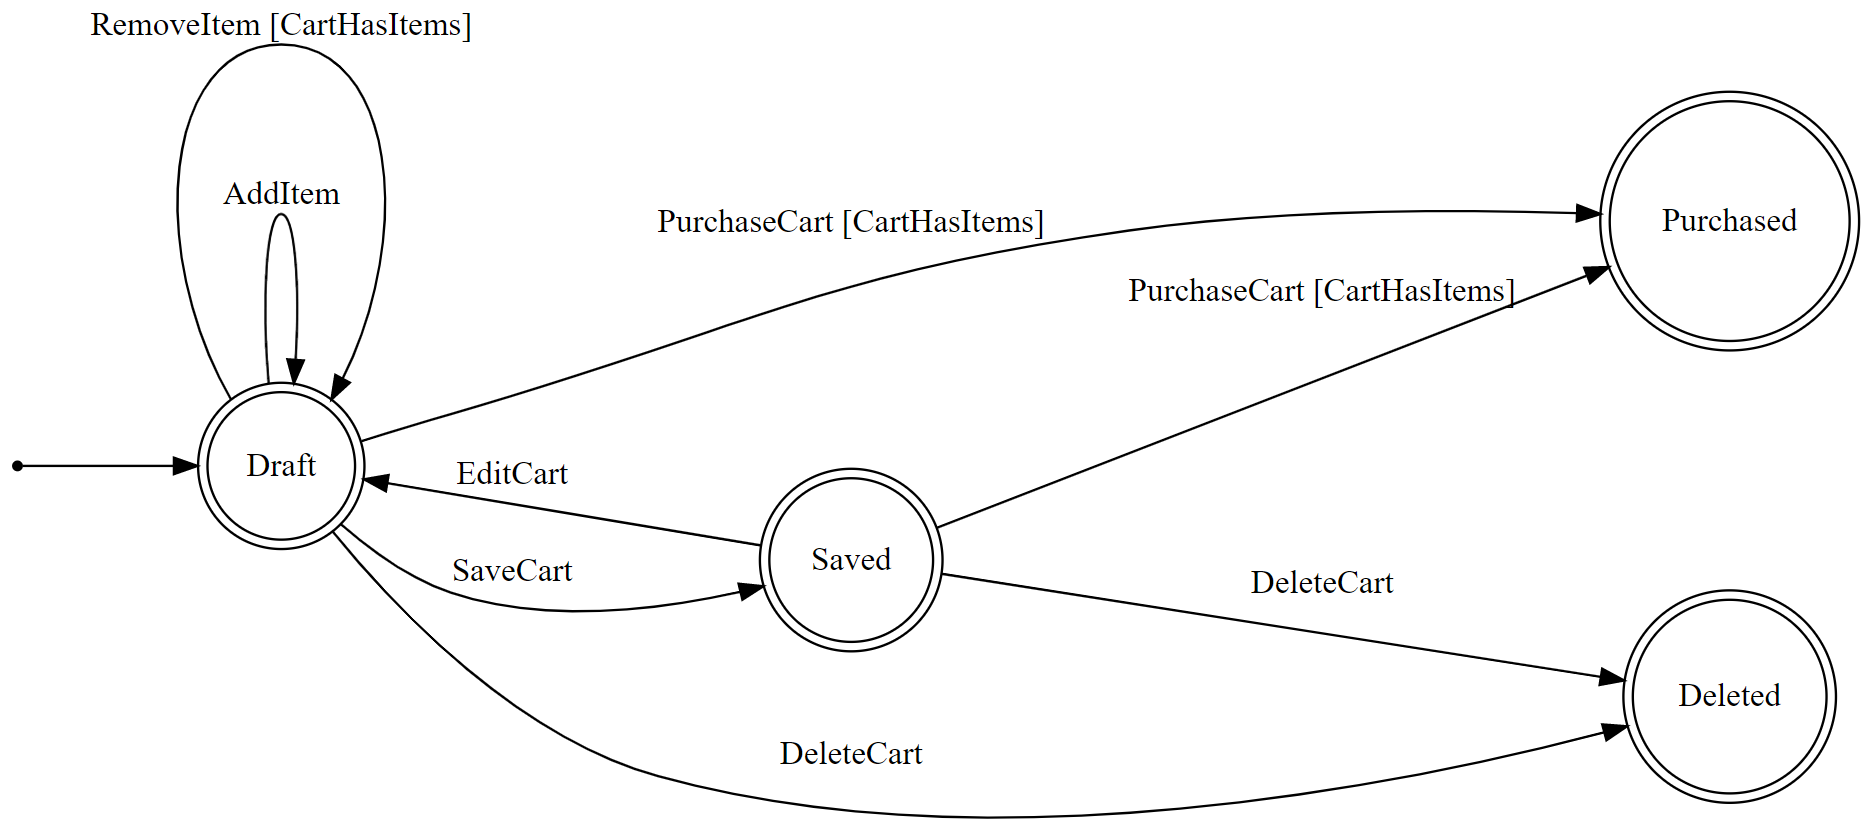
We can model this cart using a Finite State Machine. A diagram for that state machine is shown below (with the ability to add a note in any state removed for clarity).
digraph finite_state_machine {
    graph [pad="0.5", nodesep="1", ranksep="1"];
	rankdir=LR;
	size="8,5"
	node [shape = doublecircle];
    "Draft" [label="Draft"];
    "Saved" [label="Saved"];
    "Purchased" [label="Purchased"];
    "Deleted" [label="Deleted"];

    "Draft" -> "Draft" [style="solid", label="AddItem"];
    "Draft" -> "Draft" [style="solid", label="RemoveItem [CartHasItems]"];
    "Draft" -> "Deleted" [style="solid", label="DeleteCart"];
    "Draft" -> "Purchased" [style="solid", label="PurchaseCart [CartHasItems]"];
    "Draft" -> "Saved" [style="solid", label="SaveCart"];
    "Saved" -> "Deleted" [style="solid", label="DeleteCart"];
    "Saved" -> "Draft" [style="solid", label="EditCart"];
    "Saved" -> "Purchased" [style="solid", label="PurchaseCart [CartHasItems]"];

    init [label="", shape=point];
    init -> "Draft"[style = "solid"]
}
Even though this set of business rules is fairly modest, you may be able to see how much complexity it could generate in your UI layer, when you are trying to ensure that only the proper buttons or functionality are available at the times they can be used. This could also become a maintenance headache, when business rules change and you need to adjust both the back end and the front end.
Solution
Before we get to the implementation, I want to touch briefly on why I think Stateless and Blazor together are so powerful.
- Stateless has a simple API and is very expressive. So we can easily build up our business logic here. If you are interested in experimenting with Stateless, their documentation is short and has everything you need to get going.
- Blazor, because it is written in C#, can directly take advantage of our state machine, allowing the UI to enable or disable, hide or show elements based on whether they are currently allowed to be used.
Its this combination of easily defining business rules and then having the UI directly apply those rules which generates so much time savings and eliminates so much complexity.
First, we need to setup our state machine. Stateless is looking for states and triggers (inputs which can cause state transitions) to be enums. Below we can see all of the setup for our ShoppingCart class. Stateless’ fluent API is fairly readable, but I want to point out a few pieces of terminology. Permit calls define a state change that is allowed, while PermitReentry defines a transition that can happen without changing the state. For example, adding an item to a cart doesn’t change the cart’s state. The other piece of variation is some of these configuration methods end in If and some do not. When they end in If we can supply one or more Guard Clauses which determine whether the transition is allowed to occur. In this example we have just one guard clause CartHasItems defined which we use to do things like block an empty cart from being purchased.
1
2
3
4
5
6
7
8
9
10
11
12
13
14
15
16
17
18
19
20
21
22
23
24
25
26
27
28
29
30
31
32
33
34
35
36
37
38
39
40
41
42
43
44
45
public class ShoppingCart
{
    private readonly StateMachine<ShoppingCartState, ShoppingCartTrigger> stateMachine;

    public ShoppingCart()
    {
        // This constructor for the state machine allows us to store the actual state
        // outside of the state machine, in the State property, where we can persist
        // it to the database.
        stateMachine = new(() => State, (state) => State = state);

        stateMachine.Configure(ShoppingCartState.Draft)
            .PermitReentry(ShoppingCartTrigger.AddItem)
            .PermitReentryIf(ShoppingCartTrigger.RemoveItem, CartHasItems)
            .Permit(ShoppingCartTrigger.DeleteCart, ShoppingCartState.Deleted)
            .PermitIf(ShoppingCartTrigger.PurchaseCart,
                      ShoppingCartState.Purchased,
                      CartHasItems)
            .Permit(ShoppingCartTrigger.SaveCart, ShoppingCartState.Saved);

        stateMachine.Configure(ShoppingCartState.Saved)
            .Permit(ShoppingCartTrigger.DeleteCart, ShoppingCartState.Deleted)
            .Permit(ShoppingCartTrigger.EditCart, ShoppingCartState.Draft)
            .PermitIf(ShoppingCartTrigger.PurchaseCart,
                      ShoppingCartState.Purchased,
                      CartHasItems);

        // Note, we can often make the declaration of the state machine shorter and
        // easier to manage with code like this, which adds the AddNote ability to
        // all states in two lines of code, regardless of the total number of states.
        Enum.GetValues<ShoppingCartState>().ToList()
            .ForEach(x =>
                stateMachine
                    .Configure(x)
                    .PermitReentry(ShoppingCartTrigger.AddNote));

        // Uncomment to get a graph string which can be viewed at http://www.webgraphviz.com/
        //// string graph = UmlDotGraph.Format(stateMachine.GetInfo());
    }
    private bool CartHasItems() => ItemCount > 0;

    public ShoppingCartState State { get; private set; } = ShoppingCartState.Draft;

    // .... Rest of class
}
1
2
3
4
5
6
7
public enum ShoppingCartState
{
    Draft = 0,
    Purchased,
    Deleted,
    Saved,
}
1
2
3
4
5
6
7
8
9
10
public enum ShoppingCartTrigger
{
    AddItem,
    RemoveItem,
    PurchaseCart,
    DeleteCart,
    AddNote,
    SaveCart,
    EditCart,
}
The second part of the ShoppingCart has the business logic which makes use of the state machine. Though, for this example, I haven’t implemented any of that business logic, except to increase or decrease ItemCount as needed.
There are two important methods here related to the state machine.
CanFireis how we expose to the front end whether a particular trigger can fire. This passthrough method is defined because we don’t want to publicly expose thestateMachineitself.Firedoes a few things.- It checks if a trigger is allowed to fire, and if so, it fires it, and runs any
postFireActionwhich is supplied. - It logs what happens in the transition. If you need to create audit trails related to your business objects, this can make it quite simple to do so.
- Finally,
Firetakes an exclusive lock onstateMachineto prevent the possibility of multiple transitions happening at once. The reason we need this is a little subtle, because Stateless runs single threaded, but thepostFireActioncould take some time to complete.
- It checks if a trigger is allowed to fire, and if so, it fires it, and runs any
All of the business logic is represented with placeholder methods such as AddItem which calls the Fire method and provides an action to perform. In a real implementation, many of these methods would take parameters or perform more complex work in the postFireAction. We might even add some extra logic before the Fire method is called. The key to this working as expected is ensuring we don’t mutate our ShoppingCart outside of Fire and postFireAction. That way, if any of these methods is ever called while in the wrong state, nothing will happen.
1
2
3
4
5
6
7
8
9
10
11
12
13
14
15
16
17
18
19
20
21
22
23
24
25
26
27
28
29
30
31
32
33
34
35
36
37
38
39
40
41
42
43
44
45
46
47
48
49
50
51
52
53
54
55
56
public class ShoppingCart
{
    // ... State machine setup

    public int ItemCount { get; private set; }

    public List<string> Log { get; } = new();

    /// <summary>
    /// Public utility class the UI can use to test what actions are permitted
    /// </summary>
    public bool CanFire(ShoppingCartTrigger trigger) => stateMachine.CanFire(trigger);

    public void AddItem() => Fire(ShoppingCartTrigger.AddItem, () => ItemCount++);

    public void RemoveItem() => Fire(ShoppingCartTrigger.RemoveItem, () => ItemCount--);

    public void PurchaseCart() => Fire(ShoppingCartTrigger.PurchaseCart);

    public void SaveCart() => Fire(ShoppingCartTrigger.SaveCart);

    public void EditCart() => Fire(ShoppingCartTrigger.EditCart);

    public void DeleteCart() => Fire(ShoppingCartTrigger.DeleteCart);

    public void AddNote() => Fire(ShoppingCartTrigger.AddNote);


    /// <summary>
    /// Fire takes an exlcusive lock on <see cref="stateMachine"/> so we only have
    /// one transition happening at a time.
    /// </summary>
    /// <param name="trigger">Trigger to fire.</param>
    /// <param name="postFireAction">
    /// Business logic to run if we are able to fire the trigger.
    /// </param>
    private void Fire(ShoppingCartTrigger trigger, Action? postFireAction = null)
    {
        lock (stateMachine)
        {
            // The state machine will throw an exception if you call Fire when the
            // trigger is not allowed.
            if (stateMachine.CanFire(trigger))
            {
                var initialState = State;
                stateMachine.Fire(trigger);
                postFireAction?.Invoke();
                Log.Add(
                    $"{DateTime.Now} - " +
                    $"In state {initialState}. " +
                    $"Fired trigger {trigger}. " +
                    $"{(initialState != State ? $"Transitioned to {State}" : string.Empty)}");
            }
        }
    }
}
Wiring Blazor up to use the CanFire method is very simple. In this case all we are doing is using the disabled attribute on each <button> to determine whether it is currently active. In real code you may do more to show and hide buttons or other elements based on CanFire but the principal is the same everywhere.
1
2
3
4
5
6
7
8
9
10
11
12
13
14
15
16
17
18
19
20
21
22
23
24
25
26
27
28
29
30
31
32
33
34
35
<h1>Stateless + Blazor UI</h1>

<button class="btn btn-warning" @onclick="@(() => shoppingCart = new())">Reset Shopping Cart</button>

<h4>Cart State: @shoppingCart.State (@shoppingCart.ItemCount items)</h4>

<button class="btn btn-primary" disabled="@(!shoppingCart.CanFire(ShoppingCartTrigger.AddItem))" @onclick="@(shoppingCart.AddItem)">Add Item</button>
<button class="btn btn-primary" disabled="@(!shoppingCart.CanFire(ShoppingCartTrigger.RemoveItem))" @onclick="@(shoppingCart.RemoveItem)">Remove Item</button>
<button class="btn btn-primary" disabled="@(!shoppingCart.CanFire(ShoppingCartTrigger.SaveCart))" @onclick="@(shoppingCart.SaveCart)">Save Cart</button>
<button class="btn btn-primary" disabled="@(!shoppingCart.CanFire(ShoppingCartTrigger.EditCart))" @onclick="@(shoppingCart.EditCart)">Edit Saved Cart</button>
<button class="btn btn-primary" disabled="@(!shoppingCart.CanFire(ShoppingCartTrigger.DeleteCart))" @onclick="@(shoppingCart.DeleteCart)">Delete Cart</button>
<button class="btn btn-primary" disabled="@(!shoppingCart.CanFire(ShoppingCartTrigger.PurchaseCart))" @onclick="@(shoppingCart.PurchaseCart)">Purchase Cart</button>
<button class="btn btn-primary" disabled="@(!shoppingCart.CanFire(ShoppingCartTrigger.AddNote))" @onclick="@(shoppingCart.AddNote)">Add Note</button>

<div>
    <b>Log</b>
    <ul class="list-group">
        @foreach (var log in shoppingCart.Log)
        {
            <li class="list-group-item">
                @log
            </li>
        }
    </ul>
</div>

@code{
    private ShoppingCart shoppingCart;

    protected override void OnInitialized()
    {
        shoppingCart = new();
        base.OnInitialized();
    }
}
To my eye, we are now getting a lot of functionality out of some very simple user interface code. And the best thing is if we change the business rules, such as saying we will no longer allow users to save empty carts, we simply add a new guard clause in the state machine and don’t need to make any changes in the razor file. Our UI will reflect this change automatically.
Conclusion
There are many places I find Blazor to be a boon to productivity, and this is one of my favorites. It lets us define business logic in a single place, and allows the UI to leverage that definition, without requiring any web services or other layers that add complexity without much value.
I have found the pattern above to be a huge time saver when implementing and updating complex workflows that need consistent logging and hope you give it a try.
Full source code accompanying this article is available on GitHub.
Leave a Comment
Your email address will not be published. Required fields are marked *